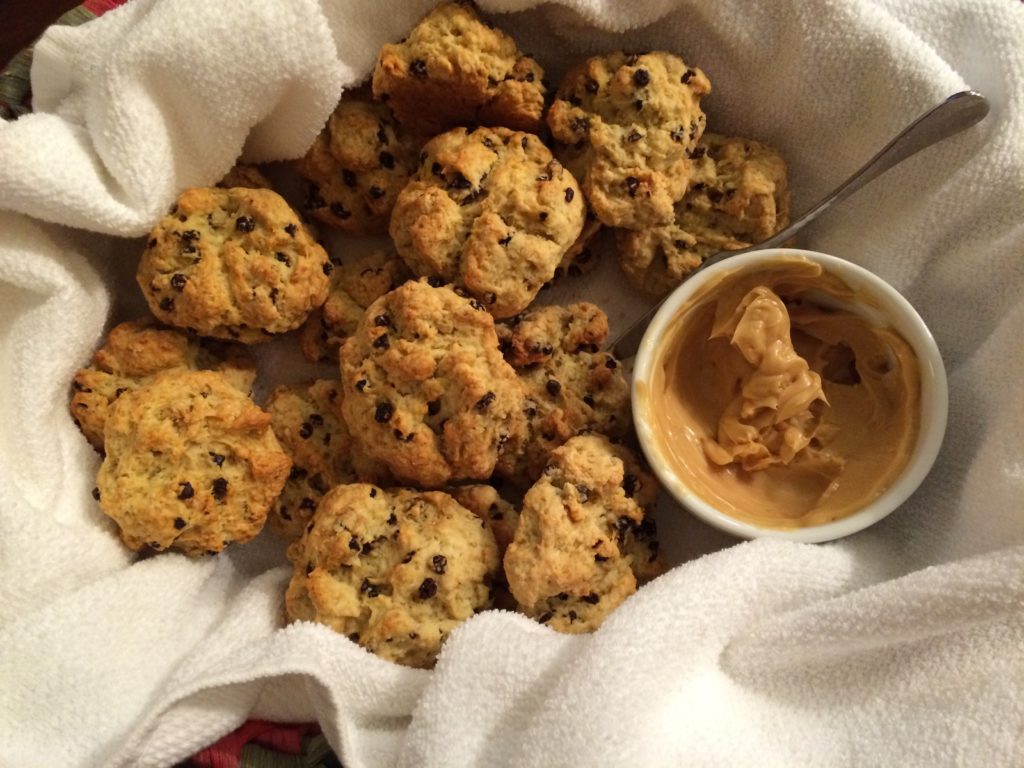
I look forward to this Irish Soda Bread every St. Patrick’s Day as much as I do my cheesecake and Irish coffee. It is that good. To be fair, it is not authentic Irish Soda Bread. It has butter in it. And a touch of sugar. And raisins. Not something the Irish of old had ready in their pantries back in the day.
The Recipe (a link)
My recipe comes from Rose Levy Beranbaum’s “The Bread Bible.” I am going to link to the recipe posted on Reddit [click here] because, well, I’m feeling a bit lazy after spending all day cooking Irish Stew…and Stout Cheddar Cheese Cheesecake…and Guinness Bread (a new recipe this year!)…and Chocolate Stout Ice Cream (also new this year)…and Whiskey Butter…and finally, these lovely Royal Soda Breads…
All I need to do tomorrow (which it almost is as I write this…) is to prepare the mashed potatoes to go with the Irish Stew, make sure the Guinness is cold, and if I’m not too tired, make a smoked fish appetizer to start it all off. I did smoke the fish for that earlier today, so we are ready to go!
Happy St. Patrick’s to everyone out there. Hope you find the pot of gold at the end of the rainbow before that sneaky little leprechaun gets it first!
It got cold here again in Texas. At least for today. Who knows? Tomorrow may be all sunshine and short sleeves again. But today is overcast and back to sweaters. I even have a fire going with the last of the wood in the fireplace. It feels cozy. All that’s missing is some Irish Coffee.
It is morning as I write this, so perhaps Irish Coffee wouldn’t be the most prudent idea. Though, as they say, it’s 5:00 somewhere! Alas, for now I will dream of it’s comforting wiles, the warmth which comes from both the heat and a generous shot of Irish whiskey. For I am, after all, a whiskey gal. And Irish whiskey is some of the best to be had…and I’ve had plenty!
Jameson Distillery and the Perfect Irish Coffee
My first trip to Ireland was back in July 2011. It was magical. A week in the lush greenness that is this beautiful country was all it took for me to fall in love. To embrace my Irish [by marriage] heritage. I had been traveling with my family, and we were on the final week of a five-week Europe vacation. One of our first stops in Ireland was to the Jameson Distillery in Middleton.
It was here that I had my first “proper” Irish Coffee. Not only did I drink one – or even two perhaps, I also learned how to make one [properly of course]. Oh, sure, it looks easy. Just add a bit of whiskey to some hot coffee and top it off with some whipped cream, right?
Hah! While that may be tasty, there are a few refined techniques which will greatly improve the experience. Part of the goal is to have the cream stay with the coffee as it is drunk. Meaning, it doesn’t get mixed into the coffee, yet you also don’t drink it off the top within the first few sips. That would leave your coffee exposed to get cold, and who wants that? No, done properly, each taste should have a bit of cold whipped cream paired with hot coffee. A nice yin/yang effect. Dark vs. Light. Hot vs. Cold. Smooth vs. Creamy. Delicious.
Coffee…the Base
It should be obvious to begin with good coffee. Now I am not going to judge and tell you to use a certain coffee. I’ll just recommend using your favorite; something you love. This is the base of the drink after all. And with so few ingredients it’s important to use the best ones you can find. My preferences tend to be a stronger brew. We are currently using a locally roasted Brazilian espresso bean. It has chocolatey notes, adding to the depth of flavor.
At Jameson’s they used a French press to make the coffee. I do love French press coffee, but I enjoy the coffee from our machine just as much. And it’s faster. So that’s what I use. Again, no judgement from me on your favorite way to brew or drink your coffee. Go with what works for you; just make it tasty.
The Whiskey
There are four ingredients in a proper Irish Coffee. I’ll take you through each one and then you can watch a video I found online [see below] showing how to put them all together. Let’s begin with the whiskey…
Obviously, the whiskey used at the distillery was Jameson’s. But if you have a personal preference for another brand, use that. It does not need to be a super premium whiskey; however, I don’t like to go too cheap here either. As I said before, there are only a few ingredients. Make them count. My preference is Jameson’s for this. I have also used Bushmill’s and Tullamore Dew. All were good. Great even.
What I don’t use: I do NOT use my Writer’s Tears [not available in the US as of this writing]. Nor do I use my Green Spot or Redbreast. These are for drinking straight, or maybe with a touch of water and/or an ice cube. Their finer qualities will get lost in this drink. Having said that, if all you have on hand is “the good stuff” and you are willing to use such fine spirits in your coffee, I say go for it. Either that or just drink the whiskey and coffee separately. Or perhaps leave out the coffee altogether…
Final Ingredients: Sugar and Cream
Brown sugar was used in Jameson’s demo. It gives a bit of depth to the drink. You can use light or dark brown sugars. Have I mentioned “preference”? Raw sugar can also be used. Or in a pinch [gasp] plain white sugar works. Experiment. Come on, it’s only a drink. Try it different ways and see which way works best for you. There are no mistakes here. Only subtle taste nuances. Go for it! I do recommend dissolving the sugar in either some of the hot coffee or the whisky ahead of time to help it mix in better.
Now for the tricky part. The cream. First, make sure you are using heavy whipping cream. If you can find low pasteurized, or even no-pasteurized, that is ideal. It whips better. But if not, go for what you can find. At the distillery they shook the cream in a cocktail shaker. If you prefer you can use a whisk or, if you are careful, a hand mixer. The important thing to remember is to not over whip the cream.
Let me repeat that: DO NOT OVER WHIP THE CREAM!
Here’s why: if you whip it too much it is going to just sit on top. You will not get that perfect integration with the coffee when sipping. Likewise, if you under whip the cream it will not float on top at all and will instead mix right into the coffee. What you want is something somewhere in between. Thick enough to stay suspended on top of the coffee, thin enough that you are able to get a little bit with each sip of the coffee below. Hot coffee coming through cold cream…a sensory delight!
The Basic Ingredients
As I mentioned, there are only a few ingredients: your favorite coffee, Irish whiskey, brown sugar and heavy whipping cream. That’s it. Four items. I always have at least three of those items on hand at all times, heavy whipping cream being the exception.
The proper vessel is important and should be warmed up ahead of time by filling it with hot water. It doesn’t need to be a designated Irish Coffee mug (though that looks nice) but it must be able to hold a hot drink. I do have a set of Irish Coffee mugs just for the occasion.
A Video on Making Irish Coffee
Rather than describe how to make a proper Irish Coffee, I came across a video from Jamie Oliver’s DrinksTube which does the job for me. Not only does it show you the process and walk you through it step-by-step, there is a bit of history behind the drink offered as well.
So there you have it, a lesson on how to make a proper Irish Coffee. Now it’s time for me to gather my ingredients and get to it…
St. Patrick’s is less than a week away and I find myself dreaming of this Stout Cheddar Cheese Cheesecake. I first had this cake at a restaurant – one long gone – many, many years ago. It was the name that first drew me in. Stout Cheddar Cheese Cheesecake. I plied the waiter with questions before finally deciding I just had to order it. Was it savory? Sweet? I had to know. (It was sweet)
It was so good I asked for the recipe. To my surprise – and utter delight – they gave it to me! Of course, being the popular restaurant it was at the time, it was in restaurant quantities. It was also given to me in weight vs. volume measurements. This would be no problem today since I do most of my baking by weight. But at that time I had never heard of using a scale to measure ingredients, so I had to convert the recipe into volume amounts. And I needed to decrease it dramatically since the version he gave me made nine large cheesecakes. Great for a busy restaurant; not so great for home.
Personal Touches
Over the years I have added my own flair to this delectable cheesecake. The most notable change involves the crust. I am not a fan of graham cracker crusts, so I make a chocolate cookie crumb crust for it. For the stout in the recipe I use Young’s Double Chocolate Stout. It is expensive? Yes, but you don’t need an entire bottle to make the syrup to swirl into the cheesecake. Hmmm, what to do with the leftovers???
Finally, I like a more dense cheesecake…something that gives my fork a little resistance when I go in for that first bite. Dense, but not too dense. So I add a little more cream cheese than the original recipe called for. Just a little. I’ve tried various amounts, but the recipe (below) reflects what I now deem to be the perfect amount.
The cheese is important!
I am pretty sure the restaurant used more of a Velveeta-style cheese for their version. I do not like Velveeta. I cannot bring myself to use it. Why use what I feel is a “fake cheese” in such a perfect, delicious cheesecake? I set out to find the best “real” cheddar for this. (But feel free to use whatever you like…if you like Velveeta, go for it!)
My first try yielded bits of cheddar that were chewy rather than soft. I don’t remember what I used, probably a really nice sharp cheddar. This is a case where more expensive does not equal better results.
So the next time I made sure to use a much creamier version. I tend to change it up each time, so I really don’t have a specific brand to offer you. I ask the cheese monger at my local store to recommend something that will melt rather than get chewy. He hasn’t let me down so far! I also look for a yellow cheddar cheese for no other reason than to add the color when you slice through the cake. Remember: you eat with your eyes as much as your mouth! It’s up to you; you can decide to go with a white cheddar, but you won’t get that visual presentation.
The Pan
I use a 9″x3″ round cheesecake pan for this. It looks like a regular cake pan, but it’s an inch deeper than a typical cake pan. It also has a removable bottom. The idea is to push the cheesecake up from the bottom. You can also use a springform pan, but to me this is easier. It’s all about what you have on hand and making it work for you.
**By the way, a little baking secret of mine is that I use these same pans for baking cakes. I place a parchment paper circle on the bottom, pour in the batter, and bake. When it is time to turn out my cakes I go around the side of the pan with a flexible spatula to loosen, then push up. No more greasing and flouring the pans before baking. I’ve been doing it this way for YEARS! It works and is a time saver, especially if you do a lot of baking.
STOUT CHEDDAR CHEESE CHEESECAKE
Please Note: This cheesecake takes time. It bakes low and slow…specifically: 225 degrees for 4 hours. So make sure to allow time in your schedule for this one. Also allow time for the crust, which is best made ahead and chilled for at least one hour. This part can be done the night before. Finally, this cheesecake is best when made a day ahead.
CRUST
Butter, melted 4 oz (1 stick)
Chocolate Wafers, crushed 8 oz
(optional) Sugar up to 1/2 cup if you like a very sweet crust
*Make crust ahead, allowing at least one hour to chill in the fridge
Prepare a 9″ cheesecake pan: insert a 9″ parchment round on the bottom. If you like, you can use a bit of butter to help hold it in place.
Mix the butter with the chocolate wafer crumbs. You can add up to 1/2 cup of sugar if you like. I prefer it less sweet and feel the cookie crumbs give enough sweetness.
Once mixed together, press into the bottom and slightly up the sides of the cheesecake pan. Wrap the outside of the pan with foil (don’t cover the top) and place in the fridge for at least one hour.
This can be prepared a day ahead
FILLING
Stout (I use Young’s Double Chocolate Stout) 5 oz reduced to 1.5 oz, cooled
Cream Cheese 2 lbs = (4) 8oz pkgs
Cheddar Cheese 1 cup
Sugar 1.5 cups
Sour Cream 1/4 cup
Eggs 3
PROCEDURE
Preheat oven to 225 degrees F
To get ready for baking: Take out the cheesecake pan with the crust (prepared above); Wrap the outside of the pan with foil to keep out the water from the water bath when baking. Place this inside a larger pan and all of that onto a sheet pan
Reduce the stout from 5 oz to 1.5 oz. Set aside to cool
In a mixer, cream together the cream cheese, cheddar cheese, sugar and sour cream on a low speed for about 5 minutes. It should be well blended with no lumps of cream cheese
Add the eggs and mix to completely blend in, about 1 minute on low
Pour the batter onto the prepared crust
Drizzle the reduced stout over the top, then use a toothpick or knife to swirl it into the cheesecake, making a decorative pattern on top
Pour boiling water into the pan which the cheesecake pan sits in; the water should come halfway up the outside of the cheesecake pan
CAREFULLY place the sheet pan with the cheesecake into the preheated oven
Bake for 2 hours; rotate the pan, then bakeanother 2 hours
Remove from oven, take the cheesecake pan out of the water and place on a rack to cool
When cool you can wrap the pan and refrigerate.
To present: If using a cheesecake pan, all you need to do is push up from the bottom. You can slide the cheesecake onto a serving platter. If you used a parchment round when making the crust you can slide it off of the removable bottom of the pan. If you used a springform pan, just release the sides and place on a platter.
This is better if you make it ahead and let it set up overnight in the fridge.
Finishing Touches
To add that perfect last touch, a properly made Irish Coffee finishes it all off…but I’ll save that recipe for a future post! 😉
And what better accompaniment for the cheesecake than a properly made Irish coffee!
Disclaimer:The link I posted for the cheesecake pan is not a site I have used, but it showed the pan nicely. I am not plugging the site, only the pan; however, the price is a good one (as of the time of this posting), so they may be worth checking out. I get no benefit from this site or any other site, so feel free to use the products which work best for you. If ever I do get any compensation for using products, I will make sure to note that.